
There is a perception that model railways, unlike other modelling hobbies (with the possible exception of slot-car racing and its more recent digital descendants) is not so much about individual models, as about layouts. It is true that many engines are modelled in their own right, and put on display shelves, and the same is true once in a while for carriages and wagons, but generally speaking, if you are modelling railways, then you need a layout because, well, it will have a railway on it.
 This leads to some interesting consequences. For those who are concerned with the overall layout, then they are happy with the overall composition, and indeed may simply want a setting on which to run model trains. If you pick up the “mainstream” magazines, you will see examples of this, each with varying degrees of realism. But for many, a layout is the ultimate goal, and if space is not available for one, then maybe a micro-layout (less than 4 square feet in area) can be built for a shelf somewhere, or stock acquired, assembled and built towards that future date when maybe the kids leave home and a large room becomes free. The example above, East Lynn, is a rare exception to this rule. It was built for exhibition purposes, and everything you see in the photo was built by one man (Trevor Nunn), mostly from scratch. So here’s a thought.
Maybe a layout is the ultimate gaol, not the ultimate goal we are often led to believe?
This thought came to me – and sorry about that terrible play on words (which came about serendipitously* by a typing error on “ultimate goal”) when I was reviewing some of my modelling activities of late. And before you ask what activities they may be, let me answer the point for you: not much to show for the past 10 years or so. This has partly been due to the usual matters of growing family, growing job demands, etc, all leading to growing tiredness, but let’s be honest. That is just an excuse. I have spent plenty of time in front of the television, a computer, or just doing not much in an armchair. I have had time, and sometimes I quite possibly had the energy, but a kind of ennui has crept in, and it is all because of one thing: a layout.
Yes, a layout: supposedly what railway modelling is all about.
I had one, twenty years ago. I gave it to a friend for him to use as a test track to try out S scale, because I couldn’t be bothered to rebuild it and it seemed a shame to throw it on the tip (at 10′ long, it exceeded my available space by 18″, so it wasn’t set up at home). He did rebuild it – the station platform, the bank at the back of the layout and the baseboard surfaces on the original station boards are all that remains of the original creation – often using the materials carefully taken up. This was particularly true of track components, and one or two structures such as the goods shed. The layout, now called “Llanfair“, is still going – you can see it at Swindon on September 10/11 – but the (re)builder died just before Christmas. My idea had been to build a simple layout (all of 4 turnouts!) on which to run some second hand rolling stock (one engine, 9 wagons and a brake van) until I had built engines and stock more inclined to my then core modelling interests. As an idea it was fine, but I tried out some techniques with track building that were different to my usual order of construction, and not all of them worked out for the best. Unfortunately, whilst in hindsight this was obvious within 20 minutes of starting to lay the track, I stupidly persevered and had no end of trouble. (I followed the advice of a good friend, who always laid his sleepers and ballast at the same time. It worked well for him, but not for me. I used too much glue, sleepers moved around, and Woodlands Scenics fine cinders ballast got under some sleepers, creating an uneven base. I should add here that there is nothing wrong with the technique nor the materials, just my application of them. My usual method is to get the track down, tweaked, tested and wired before any thoughts of ballasting come along.)
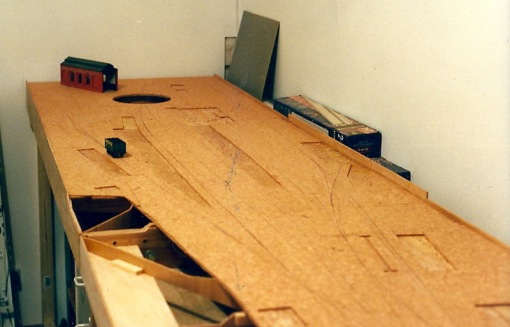
So, for twenty years I have attempted to come up with a layout design which worked for me. I did, in fact, do this very quickly and even got as far as making the baseboards and cutting, staining and laying all of the sleepers and timbers, when I discovered that I had made a mistake in the construction of the light weight boards. I was using 6mm ply, with cross bracing, etc. That was fine, but when I laid the tops, I put them on concave rather than convex, so rather than the middle being pulled down to the longitudinal strut I had thoughtfully included, the middle pushed this strut downwards whilst the glue set – white glue is a pretty good lubricant until it has set. When I came to lay the rails, I found that there was a peak at each baseboard joint. That was a week’s vacation wasted! It was almost certainly recoverable, but in truth, I was having second thoughts about it. To run a reasonable service, it needed far more engines and coaches than I had. (I haven’t mentioned wagons as building these is always a pleasure.) I found the prospect of a layout and all the stock I had to build daunting, so I kicked a few ideas about, tried out a wagon or two in “Scale 7”, and built an open wagon to 1:32 scale. Of course, some would simply see this as a set of projects within a larger plan, but 15 years ago, I was 15 years younger and didn’t want to wait until I was in my 50s to have all that! (Instead of which I have a lot less to my name than if I had got on with it, of course.) But it is these wagons that I want to talk about.
I decided that for a variety of reasons (principally the lack of the easy mental arithmetic I was used to with S scale, I mean, 7mm to a foot? What does that make a scale inch? 23 thou? Oh come on. 1:43.4527… Oh dear. No logic to this) that having built a couple of “quick, cheap and simple” wagons to Scale 7 standards, it was not what I was looking for. And they weren’t as quick, cheap or simple as I thought. Once I had provided compensation, sprung buffers (on the kit which had plastic mouldings only) interior detail, and filled the gaps in the corners, I realised I had saved little time using the kits over starting from scratch, which was another disincentive.

So I turned to gauge 1, or at least, to the 1:32 variant of it. (And a note to the NMRA: this is not “G scale”. G scale is – or was – clearly understood as models of metre gauge prototypes to a scale of 1:22.5 or thereabouts running on Gauge 1 track. Everyone in the world – including the USA – knew and understood this. Apart from the NMRA.) Linearly, this is twice the size of S, but actually 8 times the volume, so models have real presence, as the placing of an S scale body inside a gauge one body (identical prototypes) makes clear.

Like many, I was drawn to the scale on seeing some of Fred Phipp’s wonderful Gauge 1 diesel engine kits (and made a start on one – I got as far as fitting all the grilles, using superglue which I cannot abide. A few years later they fell out! I used too much glue.)

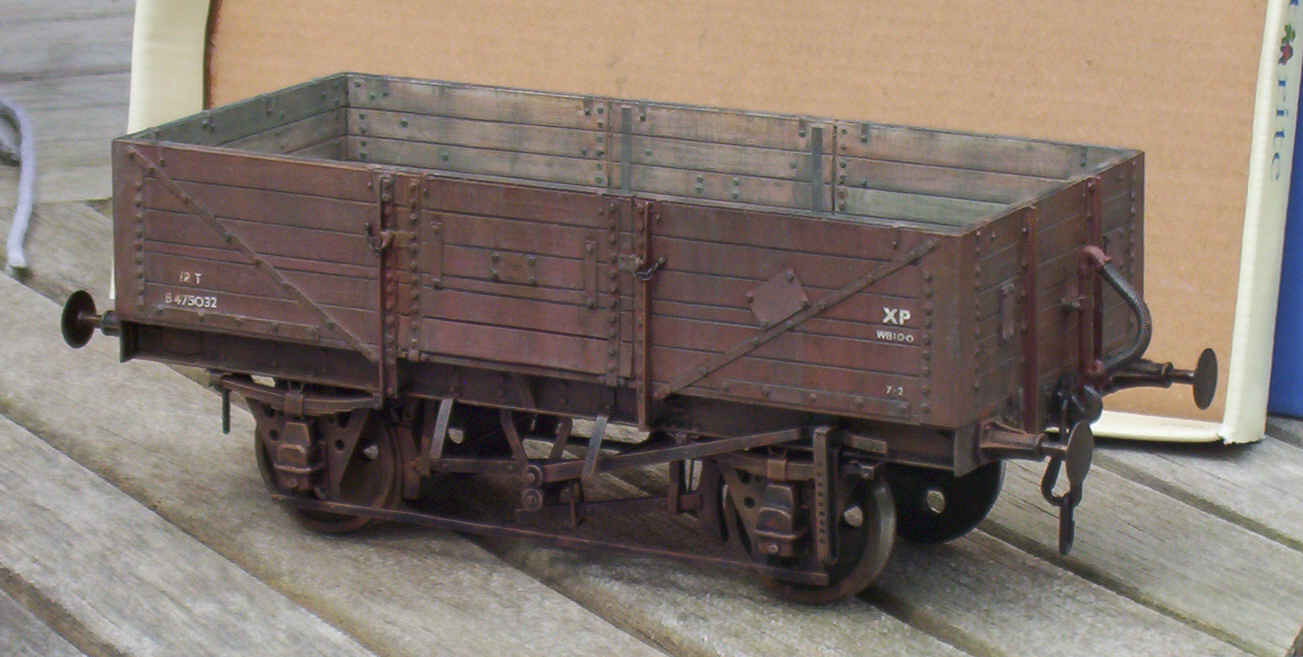
I decided to model British Rail in the “early blue” era, where the corporate image was asserting itself, but the railway was still shaking off practices handed down almost since the days of the Liverpool and Manchester Railway 140 earlier. With thoughts of a small “shunty plank” I decided to start on a wagon, to get a feel for the scale. Using mostly styrene sheet, with a few castings, it progressed in fits and starts. Basic body up on its wheels fairly quickly, then the underframe details. I couldn’t get wheels to the published “finescale” standards at the time, so I turned down some rather coarser wheels to true scale dimensions. Then nothing much for several months, then I added the ironwork details and representations of bolt heads on both ends and one side. Then nothing for another 9 months. Finally I finished it off – it took all of 45 minutes, I think, and started painting it. Undercoat of acrylic red for the most part, white for the interior, then Humbrol paints: 113 for the body, matt black 33 for the underframes, and some 0 scale decals for the lettering, courtesy of my father-in-law.
Then the weathering started. This was nothing more than a series of washes, again Humbrol, using the body colour, a dark grey (“tarmac”, I think) and on the unpainted wooden interior, a couple of washes of a cream colour to make the wood pale rather than white, and one of a red, to add a little warmth. The final wash was some “Metalcote” gunmetal over the whole thing. This brought out the relief detail, and also meant that some final dry-brushing would burnish the finish. At the time, Barry Norman lived relatively near, and a small group of S Scale MRS modellers used to meet up for a curry every so often, and he happened to see it, took it away for some pictures, and I was surprised to see it given prominence in MRJ issue 160.
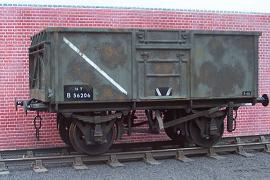
I also amended some of the omissions and errors (couldn’t do much about the fact that the model was shorter than it should have been and the wheelbase was off-centre!) on a recently introduced RTR model. The white bits are the additions, and you can’t see all of them!

In the end, I made a new underframe for it, but it was never finished as I wondered what was the point in in all this when it was still shorter than it should have been:

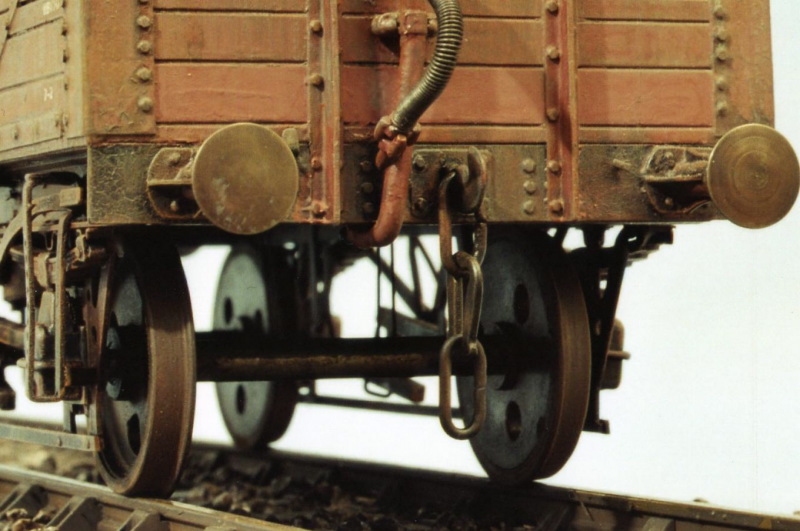
I also built an excellent new kit for a “private owner” coal wagon – the painted model presented in MRJ issue 175 was not my work, but that of the talented Adrian Marks. This was made clear when submitting the photos (the unfinished model photos were of my work), but my request for a correction was never put into print.
So, what of the gauge 1 layout? Well, it isn’t going to happen. But I built a small display stand for the wagon, using a piece of ¾” board and a few materials. That is it: 100 square inches of layout! And the great thing is, that’s all it needs to be.
This has made me realise that once in a while, building a single item in another scale may be enough to lift any clouds of indecision (analysis-paralysis over layouts) and it can stand as a model in its own right: there doesn’t have to be more.
* So look it up, including the etymology. That goes for all those who mis-use it, too!

What a terrific post, Simon. I keep re-reading it. Thanks for this.
Aww, shucks, Trevor.
Thanks.
It has a lot of parallels to a piece you wrote about escaping from self-imposed constraints: http://sscale.org/pdfs/ldj_45_On2_to_S.pdf
I heartily recommend that to anyone who finds simply building a single model in another scale is not enough, and that they really want to consider making a bigger change, be that of prototype, scale, gauge, standards or any and all combinations of those!
Heck, I simply recommend that everyone reads it: it’s a good article!